10Si and 15Si Repair Manual - Bench Check
To bench check your 10Si or 15Si unit in a test stand, proceed as follows:
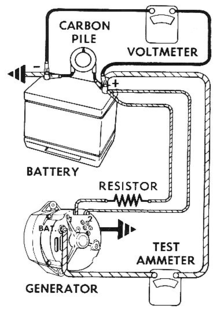
- Make connections as shown in Figure 16, except leave the carbon pile disconnected. IMPORTANT -- Ground polarity of battery and alternator must be the same. Use a fully charged battery, and a 10 ohm resistor rated at six watts or more between the alternator No. 1 terminal and the battery. The "R" terminal need not be used.
- Slowly increase the alternator speed and observe voltage.
- If the voltage is uncontrolled with speed and increases above 15.5 volts on a 12-volt system, or 31 volts on a 24-volt system, test regulator with an approved regulator tester, and check field winding. Note: The battery must be fully charged when making this check.
- If voltage is below 15.5 volts on a 12-volt system, or 31 volts on a 24-volt system, connect the carbon pile as shown.
- Operate the unit at moderate speed as required and adjust the carbon pile as required to obtain maximum current output.
- If output is within 10 amperes of rated output as stamped on alternator frame, alternator is good.
- If output is not within 10 amperes of rated output, keep battery loaded with carbon pile, and ground alternator field (Figure 5).
- Operate alternator at moderate speed and adjust carbon pile as required to obtain maximum output.
- If output is within 10 amperes of rated output, test regulator with an approved regulator tester, and check field winding.
- If output is not within 10 amperes of rated output, check the field winding, diode trio, rectifier bridge, and stator as previously covered.